

ABS Information
Pull Down Motors
Pull Down Motors
Everything you need to know about Pulldown Assemblies
Digital Dash
Window Switches
Window Regulators
Other Electrical
Bose Speakers
SDD Message
On-Board Diagnostics
New & Used Parts

Manuals
SOFT TOP AND HARDTOP REAR PULLDOWN ACTUATOR ASSEMBLY
New and rebuilt rear pulldown motors for 1987 through 1993 Cadillac Allantes are available from Allantesource. Please see the "Parts" section for more information. Before ordering, please take a moment to review the following information to help determine if your problem might be an adjustment, or if it’s likely that the motor does need to be replaced. If are looking for information about the motors that latch the front of the convertible tops to the windshield header on 1990.5 through 1993 Allantes, please continue in this section. They are covered after the rear pulldown motors.The most common problem with rear pulldown motors is misadjustment. Symptoms of misadjustment can be any of the following: repeated recycling up and down, failure to stay latched, and failure to latch at all. Before ordering a replacement motor, Allantesource will help you determine if in fact you are likely to need a replacement, of if an adjustment will likely correct you condition. If the motor is dead electrically, check for the ground wire on the latch to make sure it has not broken off. Check for power to the connector. If both are OK, replacement is indicated.The reason pulldown motors sometimes continue to cycle up and down after latching can often be corrected without replacement of the motor. Replacement is required only if the lever on the switch is broken off.
When the rear hook is captured by the latch, the front lip of the hook must depress the switch lever as the latch is lowered by the motor. When the motor trips the main switch at the bottom of it’s travel, the motor will not recycle upward IF the switch lever is depressed. When it is time to release the hook, by pulling the release lever the hook is freed. This in turn frees the switch lever, which causes the motor to cycle up. If the switch lever is not depressed by the lip on the hook, this will cause the pulldown motor to recycle up as soon as it reaches bottom. If the latch is not released, it will recycle down as soon as it reaches the top, as this is the same condition the pulldown motor sees when it is time to pull down. And it will keep moving up and down until something changes, or the battery wears down.If the latch will not properly capture the hook, sometimes this can be fixed by adjustment. Other times replacement is required. Possible causes are side to side misalignment, binding release cables, or broken or worn latch parts. To check for the cause, leave the soft top cover up. Latch up the rear of the back window. Get in the car. Take a Phillips screwdriver and attempt to push it down into the center of the latch. Make certain it catches and hold properly. Make sure the cables are slack. Then release the latch and lower the rear of the soft top slowly to see how the hook lines up with the center of the latch. Performing all these steps will give you a good chance to see what’s wrong. If you have any problems not covered, feel free to e-mail us at Allantesource@prodigy.net for further technical assistance.
HOW TO SOLVE PULLDOWN MOTOR RECYCLING
One of the most common complaints about Allante pulldown motors is the repeated recycling up and down. This can continue until your battery goes dead, or until you release the latch and either leave it unattached or try to latch again.This is a simple problem to correct, once you know how. There is no need to disconnect the wire on the back of the latch if you take the time to make the adjustments and learn the techniques on how to properly operate your top. The reason this problem occurs in the first place is that the pulldown motors, when made, were not adjusted correctly at the factory. There are two adjustments possible. They must be performed in the order given. On 1987 models, the second adjustment provision is not provided. Details on how to work around this will be provided when necessary.Here is the theory of operation. There is a 12V+ connection hot at all times to the pulldown motor (assuming the circuit breaker is left in place). The 12V- connection is provided by the J-hook on the back of the convertible top. The 12V- connection gets passed along through the wire on the back of the latch to one of the terminals on the switch mounted on the pulldown motor. This 12V- connection is why you can see sparks sometimes when the J-hook snaps into the pulldown latch. That’s also why you sometimes see sparks when attempting to lower your folded soft top into the storage well. If the J-hook touches any part of the latch, it’s just like when you are trying to latch the back of the top. It is normal for the motor to run down whenever the J-hook touches the latch. If you look at the J-hook, you will see a flat lip pointing toward the rear of the car. This flat lip is designed to hold down the lever on top of the reversing switch that is built into the pulldown motor. If you stand at the driver’s door pillar, and look at the pulldown motor, you will see the latch. Right behind the latch you will see the switch lever. If you run the pulldown motor down about half way with the manual switch under the soft top well, you will be able to see the switch lever more clearly. You will be able to press it down once the pulldown motor has been lowered half way.The adjustment of this switch lever is critical to pulldown motor operation. With the pulldown motor down at about 50% of its travel, press the switch lever down with your finger. Check to see the distance between the side of the lever and the back of the latch. They should be nearly touching. On new pulldown assemblies, there is usually 3/16" to ¼" of clearance, which is way too much. If you find the switch lever is too far from the rear of the latch assembly, the lever will need to be bent toward the front of the car, until it nearly or lightly touches the back of the latch. The best way to bend it is with a pair of needle nose pliers. Grab the lever portion of the switch about midway, and gently rotate the front of the lever toward the front of the car. It is best to press down on the switch itself with your other hand to help provide support. After adjustment, the switch lever should move up and down freely, but there should be very little clearance between the lever and the back of the latch.In most cases, the switch lever adjustment is all that is required. However, if after making this adjustment you are still having problems, on 1988 through 1993 Allantes there is an adjustment for the J-hook. (The reason the switch lever adjustment must be made first is that it is possible to adjust the J-hook far enough to hit the rear of the top boot.) Raise the rear window up and lock it with the red handled latch lever. In the raised and locked position, right below the J-hook there will be a small screw (Allen head). Try turning the screw out (counterclockwise) a couple turns and retry latching the rear window. If you start hitting the rear of the boot opening, you have gone too far. Keep retrying to latch every couple turns of the screw until desired results are achieved or you hit the boot opening. In a few instances, I have found that the threaded plate has been bent under. To check for this condition, when the rear window is fully down, the plate should be perpendicular to the ground. I have had to bend a couple with pliers to get the screw within adjustment range.On 1987 models, which do not have the latter adjustment provision, call for instructions on how to improvise this adjustment. On any Allante, pulldown motors can be adjusted to run flawlessly. Pulldown motors will never recycle once they are adjusted properly.Here are a few pointers about the J-hook popping free from the latch while the motor is on the way down:The most common latching problem I see is technique-related. Many people try to press the rear window down into the latch. This does not always work. The best way is to give the rear window a quick sharp slap downward (not a slam) from about 6" to 12" up. It takes a certain amount of force to set the latch. Once the J-hook touches metal, the motor starts to move. The motor can move downward before the latch is fully engaged, and will pop free under those circumstances. A second cause of the latch popping free is tight release cables. Make sure both the emergency release cable going into the trunk and the main release cable have slack in them, so the latch can fully seat. A third cause of popping free is interference with the under side of the boot cover. You can check through the hole in the boot with the motor fully up to make sure that the levers move freely and are not hitting the boot. The final cause of popping free is mechanical. Either latching parts are bent, or the pivots are worn and sloppy, or perhaps something is broken. In the latter case, the unit will need to be replaced.Properly adjusted, and operated with proper technique, pulldown motors will work flawlessly. No wiring changes are needed. It’s simply a matter of knowing what is needed to make the necessary adjustments, and how to latch the rear window.
There are several possible causes of failure for the front latching motors on the 1990.5 through 1993 Allantes. The small gearhead motors have internal components which break or strip. The motors can fail electrically. And the timer relays which operate the motors can fail. Before ordering replacement motors from Allantesource, please contact us for assistance in diagnosing your problem. The internal gears are not available from any source. We have tracked down and contacted the German company that made these motors. They told us they cannot supply any parts, since the motors are a proprietary product. New these motors cost around $900 each from Cadillac, but are now discontinued. We finally had new gears made by a prototype machine shop to enable us to repair these motors.
Troubleshooting 1990.5-1993 Header Latch Motors
Early model Allante’s had manual clamp hooks that secured the front of the convertible top to the top of the windshield header when the soft top was up. Later models starting with the middle of the 1990 model year were equipped with motorized latches operated by a button located behind the rear seat. The convenience of not having to walk around the car or reach across the car to latch the front of the top sometimes comes with a price, when the motors do not latch properly. The following should help determine what action is needed to fix any malfunctions that might occur.
There are three general types of problems that can be encountered: alignment, mechanical, or electrical. The alignment issue is the quickest to address. There are rollers and locating pins that must be in position in order for the rollers to rotate and lock the front of the top down when the cycle switch behind the driver’s seat is pressed. If the motors are both running when they should but not properly engaging the striker plate pockets on the header, the first item to check is the locating pins next to the motors. Are they bent? Do the fall down into the mating holes on the top of the header? Sometimes the bracket holding these pins gets bent. It usually can be straightened. One method you can use to straighten the bracket is to install a 13 mm box end wrench the pin and use it as a lever to pry the pin back into position. Usually when the pin drops down into the locating hole on the header, the roller on the motor will again line up with the pocket on the striker plate.
The next type of problem is mechanical, when the actuator motor cycles but the top is not held down properly. Usually causes for this are internal problems within the gear head. If you hear a ratcheting or grinding noise when you attempt to cycle the motors, this is what you are facing. The assembly must be replaced. Another type of mechanical problem is when one of the internal gears splits, but everything still runs the way it should. The worm gear is pressed onto the roller shaft. When the gear splits, the roller and the gear are no longer locked together. The motor will cycle and shut off, and the top will appear to be latched. But then it can lift up as you are driving. This is a potentially serious problem, as the roof can fly up at highway speed and bend the frame mechanism. To check for this problem, after the front of the top has been latched, go to each front corner and attempt to pull the top upwards. If it moves up, then that header actuator has an internal problem and must be replaced. In other cases with a split internal gear, the roller shaft slides out of the gear head. Replacement of the assembly is required.
The last type of problem is electrical, when the actuator motors do not cycle properly when the switch is pressed. Usually the motor is fine, but there is a control circuit problem. Here’s the procedure to determine what is wrong. Whenever the front of the top is being locked down, the both corners of the front of the top should be drawn down in a fluid motion. It is a very good idea to watch the top header each time you lock it down as you are pressing the switch behind the driver’s seat. That way, if something fails to lock properly, you will notice it before driving, and not find out the hard way. If one or both of the motors do not seem to be operating consistently, open the boot, and put the top down into the well. If the motor will not work at all, try spinning the splined shaft on the motor a few turns, then press the switch to OPEN again to try to unlatch the top. Or turn the shaft as much as necessary to get the roller to clear the striker pocket on the header. Once you have the top in the well, with the boot up so you can see what’s happening, repeatedly cycle the actuators OPEN and CLOSE until you can establish a pattern. In one extreme case, I was told there was no pattern. So I had the owner prepare a detailed chart as to exactly what happened with each press of the switch for both motors in each direction for 20 cycles of operation. That particular case was complicated, since there were two different problems. Normally it only takes a few cycles and the pattern becomes obvious right away. In the simplest case, one motor will work in both directions flawlessly, and the other motor won’t work at all. If this is what you find, spin the splined shaft a few turns, then try the switch again. If the problem motor will always turn after the splined shaft has been turned, the problem is likely to be a defective timer relay, and not the motor itself. The control relays for the 1990.5 through 1992 models are located behind the removable trim cover behind the driver’s seat that is similar to the cover over the battery. If you have a 1990 factory service manual, the component location diagram can be found on page 8A-201-23. If you have a 1991/1992 factory service manual, the component location diagram can be found on page 8A-201-23, view A. Insert a screwdriver between the cover and the switch panel, and pry out the lip of the cover, then slide the cover forward.
Look on the body behind the panel to find four relays screwed to the side of the car.
Then follow the wires down to a loop that forms underneath. There will be two additional relays taped to the harness. Cut the tape, and swap the relays.
Then recheck motor operation. If the problem moves to the other motor, one of the timer relays is bad and must be replaced. To determine which one, pull them one at a time to see which one is working. If the problem does not move, then the next step is to remove the motor that does not work, and plug it into the plug for the other motor. If the problem stays with the motor, then there is an internal motor problem, and the motor must be replaced.
The relays for 1993 Allante’s are located in a different position, on a relay strip over the battery behind the passenger seat. There are 7 relays on the strip. The timer relays are the taller relays in located in positions #2 and #7 counting from the front of the car.
Swap them to see if the problem moves to the other motor. If you have a ‘93 factory service manual, the component location diagram can be found on Page 8A-201-40.
Another type of electrical problem can be caused by a bad open-close switch. In this case, both motors will always react the same. To check for a switch problem, you can swap the header motor switch with the manual switch for the rear pulldown, the one that is located under the top well. These switches are identical.
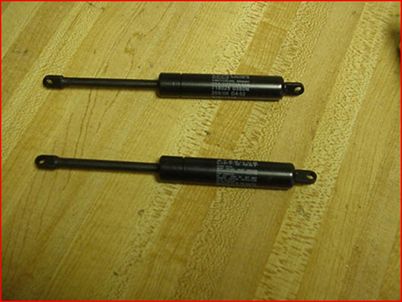
SOFT TOP COVER LIFT STRUTS
The soft top covers on 1990.5 through 1993 Allantes should stay up by themselves when opened. If not, the gas charged struts have lost part or all of their charge. Allantesource has these struts in stock. To replace your struts, it will be necessary to remove the soft top cover from the hinges, the remove the hinges from the car.
The above procedures should help you determine what’s wrong if you have a problem securing the front of your convertible top to the top of the windshield header with the header latch motors. For additional help, feel free to e-mail us at Allantesource@prodigy.net or phone us at 561-844-3938.
Click to download Pulldown Motors![]()

HEADER LATCHING MOTORS 1990.5 THROUGH 1993
copyright © 2015 - Allantesource.com - all rights reserved